Masonry tuckpointing techniques have evolved significantly from the basic hammer-and-chisel methods used for centuries. Today, professional masons combine traditional craftsmanship with modern materials and technology to deliver tuckpointing that lasts decades.
Whether you’re a contractor looking to refine your methods or a homeowner wanting to understand what quality tuckpointing looks like, knowing these 8 techniques will help you achieve — or demand — results that truly last.
In this guide, we break down every masonry tuckpointing technique used by professional masons, including the materials, tools, and expertise each one requires. Every technique is one we use daily at North Shore Brickwork.
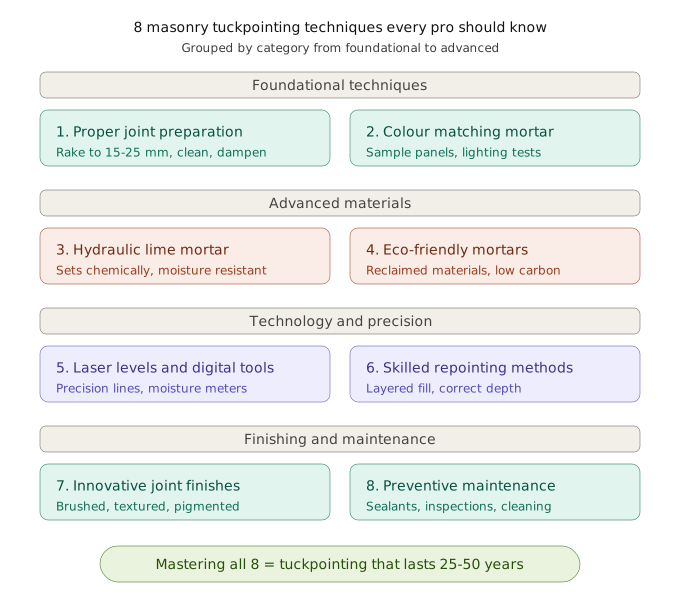
1. Proper Joint Preparation: The Foundation of All Masonry Tuckpointing Techniques
The most important of all masonry tuckpointing techniques is also the least glamorous: thorough joint preparation. Without proper prep, even the best mortar will fail.
The correct raking depth
Old mortar must be removed to a minimum depth of 15–25 mm (2–2.5 times the joint width). This creates enough space for the new mortar to form a strong mechanical bond.
Shallow raking (under 10 mm) is the single biggest cause of tuckpointing failure. The new mortar has nothing to grip and pops out within 1–2 freeze-thaw cycles.
Cleaning and dampening
After raking, joints must be brushed clean of all dust and debris. A stiff bristle brush or compressed air removes particles that prevent adhesion. The joints are then dampened with water — not soaked — to prevent dry bricks from sucking moisture out of fresh mortar before it can cure.
💡 Pro Tip
We use an oscillating multi-tool with a carbide blade for precision raking on historic brick. It’s slower than an angle grinder but prevents the vibration damage that cracks old, soft bricks. This single tool choice separates professional masonry tuckpointing techniques from amateur approaches.
2. Colour Matching Mortar: The Art of Seamless Tuckpointing
Among the most skilled masonry tuckpointing techniques, colour matching separates adequate work from truly invisible repair. The goal is a mortar that blends so perfectly with the existing joints that the repair becomes undetectable.
How professionals colour match
Sample panels: Before starting the main job, we create 3–5 small test patches using different mortar blends. These are applied to an inconspicuous area and left to cure for 48 hours, since mortar colour changes significantly as it dries.
Lighting tests: Mortar appears different in direct sunlight, shade, and artificial light. We check sample panels at multiple times of day before committing to a final mix.
Pigment blending: Custom colour is achieved by adding iron oxide pigments to the mortar mix. Small adjustments (as little as 2–3% by weight) create dramatically different tones.
According to the Brick Industry Association, proper colour matching is essential for maintaining the visual integrity of historic brickwork during tuckpointing repairs.
3. Hydraulic Lime Mortar: The Superior Durability Technique
Hydraulic lime mortar is one of the most important masonry tuckpointing techniques to master for historic and premium work. Unlike standard Portland cement mortar, hydraulic lime sets through a chemical reaction with water — not air drying.
| Property | Hydraulic lime | Portland cement | Natural lime putty |
| Setting method | Chemical (hydraulic) | Chemical | Air carbonation |
| Flexibility | High | Low | Very high |
| Breathability | Excellent | Poor | Excellent |
| Cure time | 3–7 days | 24–48 hours | Weeks–months |
| Self-healing | Yes (micro-cracks) | No | Yes |
| Cost | 20–40% premium | Standard | 30–50% premium |
| Lifespan | 30–50+ years | 15–25 years | 50+ years |
The key advantage: Hydraulic lime is breathable and flexible, meaning it allows trapped moisture to escape and absorbs minor structural movement without cracking. This makes it ideal for old buildings where rigid cement would cause brick spalling.
4. Eco-Friendly Tuckpointing: Sustainable Materials and Methods
Eco-friendly masonry tuckpointing techniques are increasingly important as the construction industry moves toward sustainability:
Lime-based mortars: Lime production generates 20–30% less CO2 than Portland cement. Lime mortars also reabsorb CO2 over their lifetime through carbonation, partially offsetting their carbon footprint.
Reclaimed materials: Salvaged bricks and reclaimed aggregate reduce demand for new manufacturing. Many tuckpointing projects use reclaimed mortar sand for authentic colour matching.
Low-waste techniques: Precision raking and careful mortar application minimize material waste. A skilled mason wastes less than 5% of mortar mix, compared to 15–20% for inexperienced workers.
Water-based sealants: Modern breathable sealants use water-based formulations instead of solvent-based products, reducing VOC emissions during application.
5. Technology-Assisted Masonry Tuckpointing Techniques
Modern technology enhances traditional masonry tuckpointing techniques without replacing skilled craftsmanship:
Laser levels: Ensure perfectly straight horizontal and vertical joint lines. Essential for large-area tuckpointing where visual consistency matters.
Digital moisture meters: Measure moisture content in bricks and mortar before and after repair. This data confirms that joints are properly dampened before mortar application and that curing is proceeding correctly.
Thermal imaging cameras: Identify hidden moisture pockets and cold bridges behind masonry walls. This technology reveals problems invisible to the naked eye, allowing targeted repairs.
Mobile estimating apps: Calculate material quantities, track project progress, and document work with photos for client records. Professional documentation builds trust and provides warranty evidence.
The Mason Contractors Association of America encourages the adoption of technology to improve accuracy and efficiency in masonry tuckpointing techniques.
6. Advanced Repointing Methods for Structural Integrity
Among the most critical masonry tuckpointing techniques, proper repointing ensures the structural soundness of the entire wall:
Layered mortar application
Professional masons apply mortar in 2–3 thin layers rather than one thick fill. Each layer is allowed to firm up (but not fully cure) before the next is pressed in. This eliminates air pockets and ensures maximum bond density.
Compression technique
Each mortar layer is compressed firmly into the joint using a pointing trowel angled at 45 degrees. This forces mortar into the micro-texture of the brick surface, creating a mechanical bond that resists water and freeze-thaw cycling.
Correct joint profiling
The final joint profile must match the existing wall. Common profiles include flush, concave (bucket-handle), weather-struck, and recessed. Each profile has different water-shedding characteristics that must match the wall’s design intent.
| Joint profile | Water resistance | Aesthetic | Best for |
| Concave (bucket-handle) | Excellent | Clean, rounded | Most residential |
| Flush | Good | Flat, minimal | Modern buildings |
| Weather-struck | Excellent | Angled, traditional | Exposed walls |
| Recessed (raked) | Poor | Shadow effect | Sheltered areas only |
7. Innovative Joint Finishing Techniques
Finishing is where masonry tuckpointing techniques become an art form. The final joint appearance is what the homeowner sees every day:
Brushed finish: A soft bristle brush is drawn across the mortar surface when it’s firm but not fully set. This creates a subtle texture that mimics aged mortar, making repairs blend naturally with original work.
Pigmented finishing: Dry pigment powder is dusted onto wet mortar just before final tooling. This creates a surface colour layer that can perfectly match weathered original mortar, even when the base mix colour differs slightly.
Overgrouting technique: A thin layer of mortar is applied over the joint and onto the brick edges, creating a wider-appearing joint. This technique is used on historic buildings where original joints were wider than modern standards.
Textured stamping: Custom stamps or textured tools create patterns in the mortar surface. This is a decorative technique used for feature walls and architectural accent areas.
💡 Finishing Technique Tip
The timing of your finish is everything. Too early and the mortar smears; too late and it won’t take a clean impression. The ideal moment is when you can press your thumb into the mortar and leave a print without mortar sticking to your skin — usually 30–60 minutes after application, depending on temperature and humidity.
8. Preventive Maintenance Techniques After Tuckpointing
The final masonry tuckpointing technique is actually about what happens after the work is complete. Preventive maintenance extends tuckpointing lifespan by 5–15 years:
Curing protection (days 1–7): Fresh mortar must be protected from direct sun, rain, and freezing for 3–7 days. We use breathable fabric covers or periodic misting in hot weather to ensure proper curing.
Breathable sealant (after 28 days): Once the mortar is fully cured, a vapour-permeable masonry sealant repels surface water while allowing internal moisture to escape. Reapply every 5–7 years.
Annual visual inspection: Walk the perimeter of the building once per year, checking for hairline cracks, discolouration, or mortar softening. Catching issues early means spot repairs, not full re-tuckpointing.
Gutter and drainage maintenance: Overflowing gutters dump water directly onto mortar joints. Clean gutters twice yearly and ensure downspouts direct water away from walls.
Low-pressure cleaning: Clean brick surfaces annually with low-pressure water (under 500 PSI) and appropriate detergent. High-pressure washing erodes mortar joints and forces water into wall cavities.
Choosing the Right Mortar for Each Masonry Tuckpointing Technique
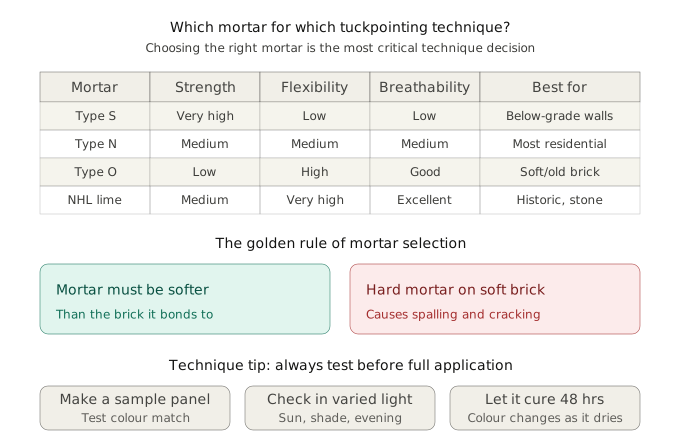
Selecting the correct mortar is the single most important decision in any tuckpointing project. Here’s a quick reference:
| Situation | Recommended mortar | Why |
| Standard residential walls | Type N (1:1:6) | Balanced strength and flexibility |
| Below-grade / retaining walls | Type S (1:0.5:4.5) | Maximum compressive strength |
| Soft or historic brick | Type O (1:2:9) or NHL lime | Softer than the brick, breathable |
| Stone walls | NHL hydraulic lime | Breathable, flexible, self-healing |
| Chimney above roofline | Type N or NHL lime | Weather exposure demands flexibility |
| Pre-1920s buildings | NHL lime or lime putty | Matches original mortar properties |
The ASTM C270 standard provides the definitive specification for mortar selection in masonry tuckpointing techniques. Always verify your mortar choice against this standard.
Need Expert Tuckpointing in Milwaukee?
North Shore Brickwork uses every masonry tuckpointing technique in this guide on real projects daily. We deliver craftsmanship that lasts decades, not years.
Contact North Shore Brickwork today for a free tuckpointing assessment.
FAQs | Masonry Tuckpointing Techniques
Q: What are the most important masonry tuckpointing techniques?
The three most critical techniques are proper joint preparation (raking to 15–25 mm depth), correct mortar selection (matching the brick’s hardness), and layered application (pressing mortar in 2–3 thin layers). These foundational techniques determine whether the repair lasts 5 years or 50.
Q: Which mortar type is best for tuckpointing?
Type N mortar (1:1:6 cement:lime:sand) is best for most residential tuckpointing. For historic or soft brick, use Type O or NHL hydraulic lime. For below-grade work, use Type S. The mortar must always be softer than the brick.
Q: How do you colour match mortar for tuckpointing?
Create 3–5 sample patches using different mortar blends on an inconspicuous area. Allow 48 hours for curing (colour changes as mortar dries). Check samples in direct sun, shade, and evening light before committing to a final mix.
Q: What is hydraulic lime mortar and why use it?
Hydraulic lime mortar sets through a chemical reaction with water rather than air drying. It’s breathable, flexible, and self-healing for micro-cracks. It lasts 30–50+ years and is the gold standard for historic masonry tuckpointing techniques.
Q: Can technology improve tuckpointing results?
Yes. Laser levels ensure straight lines, digital moisture meters verify proper dampening, and thermal cameras reveal hidden moisture. Technology enhances — but never replaces — skilled craftsmanship.
Q: What is the correct depth for raking mortar joints?
Minimum 15–25 mm, or 2–2.5 times the joint width. Remove until you reach firm, sound mortar. Shallow raking (under 10 mm) is the most common cause of tuckpointing failure.
Q: How do you protect tuckpointing after completion?
Protect from sun, rain, and freezing for 3–7 days during curing. Apply breathable sealant after 28 days. Inspect annually. Clean gutters twice yearly. Use low-pressure washing only (under 500 PSI).
Q: What are eco-friendly tuckpointing techniques?
Use lime-based mortar (20–30% less CO2 than cement), reclaimed aggregate, water-based sealants, and precision application to minimize waste. Lime mortar also reabsorbs CO2 through carbonation over its lifetime.
Q: How long do professional tuckpointing techniques last?
Professional masonry tuckpointing techniques produce repairs lasting 20–30 years with standard mortar and 30–50+ years with hydraulic lime. Poor techniques fail within 2–5 years.
Q: Should I hire a professional or DIY tuckpointing?
Small ground-level repairs on modern brick can be DIY if you follow proper techniques. For historic brick, stone walls, chimneys, or large areas, hire a professional. Incorrect mortar or technique causes damage that costs 5–10 times more to fix than the original repair.